RSS Syndication
Linq to SQL on Mono Update: NerdDinner on Mono - Jonathan Pryor's web log
« Where are all the fuel efficient cars? | Main | Mono.Data.Sqlite & System.Data in MonoTouch 1.2 [Preview] »
Linq to SQL on Mono Update: NerdDinner on Mono
NerdDinner is an ASP.NET MVC sample, licensed under the Ms-PL with sources hosted at CodePlex.
It is now possible to run the web portions of NerdDinner 1.0 on Linux with Mono trunk, thanks to Marek Habersack and Gonzalo Paniagua Javier's help with Mono's ASP.NET and ASP.NET MVC support, and the DbLinq community's assistance with Linq to SQL support.
This shows a growing level of maturity within Mono's Linq to SQL implementation.
- Build Mono from trunk. The Parallel Mono Environments page may be helpful.
- Download the NerdDinner 1.0 sources through a web browser. (curl or wget won't work.)
- Extract the NerdDinner sources:
$ mkdir -p $HOME/tmp
$ cd $HOME/tmp
$ unzip "/path/to/NerdDinner 1.0.zip"
- Build NerdDinner 1.0:
$ cd "$HOME/tmp/NerdDinner 1.0/NerdDinner" $ mkdir bin $ gmcs -t:library -out:bin/NerdDinner.dll -debug+ -recurse:'*.cs' \ -r:System -r:System.Configuration -r:System.Core \ -r:System.Data -r:System.Data.Linq -r:System.Web \ -r:System.Web.Abstractions -r:System.Web.Mvc \ -r:System.Web.Routing - As mentioned in the introduction, only the web portion runs under Mono,
as does the data access layer (System.Data.Linq, more
affectionately known as Linq to SQL). The database is still Microsoft
SQL Server. Find yourself a Windows machine, install SQL Server 2008
(Express
is fine), and perform the following bits of configuration:
- Create the database files:
- Copy the NerdDinner_log.ldf and NerdDinner.mdf files from the $HOME/tmp/NerdDinner 1.0/NerdDinner/App_Data directory to your Windows machine, e.g. C:\tmp.
- Within Windows Explorer, go to C:\tmp, right-click the C:\tmp folder, click Properties, click the Security tab, click Edit..., and add the Full Control, MOdify, Read & execute, List folder contents, Read, and Write permissions to the User group. Click OK.
- Repeat the above permissions modifications for the NerdDinner_log.ldf and NerdDinner.mdf files in C:\tmp.
- Add the NerdDinner database files to Microsoft SQL Server:
- Start Microsoft SQL Server Management Studio (Start → All Programs → Microsoft SQL Server 2008 → SQL Server Management Studio).
- Connect to your database instance.
- Within the Object Explorer (View → Object Explorer), right-click the database name and click Attach....
- Within the Attach Databases dialog, click the Add... button, and choose C:\tmp\NerdDinner.mdf in the Locate Database Files dialog. Click OK in both the Locate Database Files dialog and the Attach Databases dialog.
- Enable mixed-mode authentication:
- Start Microsoft SQL Server Management Studio.
- Connect to your database instance.
- Within the Object Explorer, right-click the database name and click Properties.
- In the Server Properties dialog, select the Security page.
- In the Server authentication section, select the SQL Server and Windows Authentication mode radio button.
- Click OK.
- Restart SQL Server by right-clicking on the database name and clicking Restart.
- Add a SQL Server user:
- Within SQL Server Management Studio, connect to the database instance.
- Within the Object Explorer, expand the Security → Logins tree node.
- Right-click the Logins node, and click New Login....
- In the Login - New dialog, enter a login name. We'll use jonp for discussion purposes. Select the SQL Server authentication dialog button, and enter a password in the Password and Conform Password text boxes. For discussion purposes we'll use 123456.
- Still within the Login - New dialog, select the User Mapping page. In the Users mapped to this login section, select the checkbox in the Map column corresponding to the NerdDinner database. Within the Database role membership for: NerdDinner section, select the db_datareader and db_datawriter roles. Click OK.
- Enable remote access to SQL Server (see
also):
- Configure SQL Server:
- Start SQL Server Configuration Manager (Start → All Programs → Microsoft SQL Server 2008 → Configuration Tools → SQL Server Configuration Manager).
- In the left-hand pane, select the SQL Server Configuration manager (Local) → SQL Server Network Configuration → Protocols for Database Instance Name node.
- In the right pane, double click the TCP/IP Protocol Name.
- In the Protocol tab, set Enabled to Yes. Click OK.
- In the left-hand pane, go to the SQL Server Configuration Manager (Local) → SQL Server Services node.
- In the right pane, double-click SQL Server Browser.
- In the Service tab, set the Start Mode property to Automatic. Click OK.
- Right-click SQL Server Browser, and click Start.
- Right-click SQL Server, and click Restart.
- Configure Windows Firewall
- Within Windows Control Panel, open the Windows Firewall applet.
- Click the Allow a program through Windows Firewall link.
- In the Windows Firewall Settings dialog, click the Exceptions tab.
- Click Add program..., and add the following
programs:
- sqlbrowser.exe (C:\Program Files\Microsoft SQL Server\90\Shared\sqlbrowser.exe)
- sqlservr.exe (C:\Program Files\Microsoft SQL Server\MSSQL10.SQLEXPRESS\MSSQL\Binn\sqlservr.exe)
- Click OK.
- Configure SQL Server:
- Create the database files:
- Back on the Linux side of things, edit $HOME/tmp/NerdDinner
1.0/NerdDinner/ConnectionStrings.config, and change the
NerdDinnerConnectionString connection string to:
You will need to adjust the machine name in the Data Source parameter to contain your actual computer name, and change the User ID and Password to whatever values you chose in §5.E.iv.<add name="NerdDinnerConnectionString" connectionString="Data Source=gourry\SQLEXPRESS;Initial Catalog=NerdDinner;User ID=jonp;Password=123456;"/> - NerdDinner makes use of ASP.NET's MembershipProvider functionality, so a
SQLite database needs to be created to contain the username and password
information for the NerdDinner site. This is detailed at the
ASP.NET
FAQ and Guide: Porting ASP.NET Applications pages:
$ cd "$HOME/tmp/NerdDinner 1.0/NerdDinner/App_Data

# Create the commands needed to configure the SQLite database:
$ cat > aspnetdb.sql <<EOF
CREATE TABLE Users (
 pId                                     character(36)           NOT NULL,
 Username                                character varying(255)  NOT NULL,
 ApplicationName                         character varying(255)  NOT NULL,
 Email                                   character varying(128)  NOT NULL,
 Comment                                 character varying(128)  NULL,
 Password                                character varying(255)  NOT NULL,
 PasswordQuestion                        character varying(255)  NULL,
 PasswordAnswer                          character varying(255)  NULL,
 IsApproved                              boolean                 NULL,
 LastActivityDate                        timestamptz             NULL,
 LastLoginDate                           timestamptz             NULL,
 LastPasswordChangedDate                 timestamptz             NULL,
 CreationDate                            timestamptz             NULL,
 IsOnLine                                boolean                 NULL,
 IsLockedOut                             boolean                 NULL,
 LastLockedOutDate                       timestamptz             NULL,
 FailedPasswordAttemptCount              integer                 NULL,
 FailedPasswordAttemptWindowStart        timestamptz             NULL,
 FailedPasswordAnswerAttemptCount        integer                 NULL,
 FailedPasswordAnswerAttemptWindowStart  timestamptz             NULL,
 CONSTRAINT users_pkey PRIMARY KEY (pId),
 CONSTRAINT users_username_application_unique UNIQUE (Username, ApplicationName)
);

CREATE INDEX users_email_index ON Users (Email);
CREATE INDEX users_islockedout_index ON Users (IsLockedOut);

CREATE TABLE Roles (
 Rolename                                character varying(255)  NOT NULL,
 ApplicationName                         character varying(255)  NOT NULL,
 CONSTRAINT roles_pkey PRIMARY KEY (Rolename, ApplicationName)
);

CREATE TABLE UsersInRoles (
 Username                                character varying(255)  NOT NULL,
 Rolename                                character varying(255)  NOT NULL,
 ApplicationName                         character varying(255)  NOT NULL,
 CONSTRAINT usersinroles_pkey PRIMARY KEY (Username, Rolename, ApplicationName),
 CONSTRAINT usersinroles_username_fkey FOREIGN KEY (Username, ApplicationName) REFERENCES Users (Username, ApplicationName) ON DELETE CASCADE,
 CONSTRAINT usersinroles_rolename_fkey FOREIGN KEY (Rolename, ApplicationName) REFERENCES Roles (Rolename, ApplicationName) ON DELETE CASCADE
);

CREATE TABLE Profiles (
 pId                                     character(36)           NOT NULL,
 Username                                character varying(255)  NOT NULL,
 ApplicationName                         character varying(255)  NOT NULL,
 IsAnonymous                             boolean                 NULL,
 LastActivityDate                        timestamptz             NULL,
 LastUpdatedDate                         timestamptz             NULL,
 CONSTRAINT profiles_pkey PRIMARY KEY (pId),
 CONSTRAINT profiles_username_application_unique UNIQUE (Username, ApplicationName),
 CONSTRAINT profiles_username_fkey FOREIGN KEY (Username, ApplicationName) REFERENCES Users (Username, ApplicationName) ON DELETE CASCADE
);

CREATE INDEX profiles_isanonymous_index ON Profiles (IsAnonymous);

CREATE TABLE ProfileData (
 pId                                     character(36)           NOT NULL,
 Profile                                 character(36)           NOT NULL,
 Name                                    character varying(255)  NOT NULL,
 ValueString                             text                    NULL,
 ValueBinary                             bytea                   NULL,
 CONSTRAINT profiledata_pkey PRIMARY KEY (pId),
 CONSTRAINT profiledata_profile_name_unique UNIQUE (Profile, Name),
 CONSTRAINT profiledata_profile_fkey FOREIGN KEY (Profile) REFERENCES Profiles (pId) ON DELETE CASCADE
);
EOF

# Create the SQLite database:
$ sqlite3 aspnetdb.sqlite
sqlite> .read aspnetdb.sql
sqlite> .quit
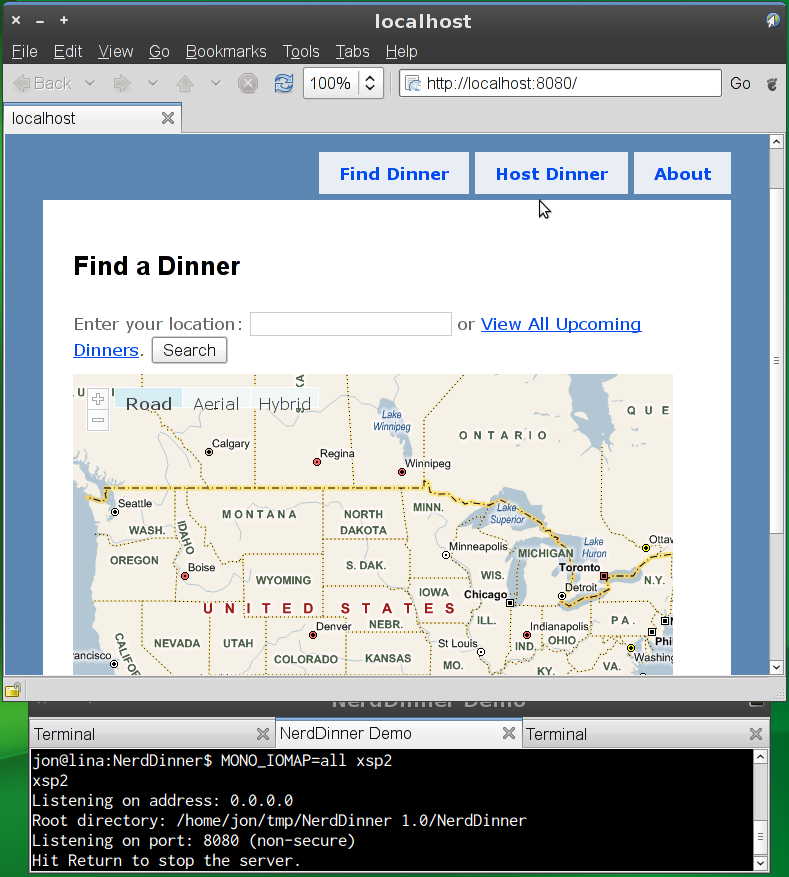
- Run the web app:
The MONO_IOMAP environment variable is needed because some link targets used within NerdDinner require case insensitivity.$ MONO_IOMAP=all xsp2
blog comments powered by Disqus